

Getting started with Klocwork Desktop Plug-in for Visual StudioGetting started with Klocwork Desktop Plug-in for Visual StudioThe Klocwork Desktop Plug-ins for Visual Studio help you detect and fix issues before check-in. The Visual Studio plug-ins support C/C++, C# and mixed projects and solutions, but certain features are not supported for C#. The plug-ins are equipped with several popular C/C++ refactorings, such as renaming and inlining functions, that can be performed within your IDE. For Visual Studio, there are two versions of the plug-in: the 'Microsoft Visual Studio Extension 2012+' (Visual Studio Extension) and the 'Microsoft Visual Studio addin' (Visual Studio addin). For all versions of Visual Studio 2012 and newer, we recommend that you use the Visual Studio Extension so that you can take advantage of the newest features and enhancements, for example, the ability to view server-only issues. If you are running Visual Studio 2010, you must use the Visual Studio addin. You can also customize project settings, issue filters and analysis settings to your own preferences. For more information about these features, see the topics below. Connect to a project on the Klocwork ServerYou get the most from desktop analysis when you connect a local project to a project on the Klocwork Server. The local project is analyzed quickly while incorporating Klocwork knowledge bases generated on the server where additional source files were analyzed (for example, shared libraries). Connecting to a server project also allows you to share issue status information with the integration build analysis and among team members. You can also run a standalone desktop analysis, but the analysis only derives knowledge from the local project's source files, and is not recommended. You perform this step only once for each project.
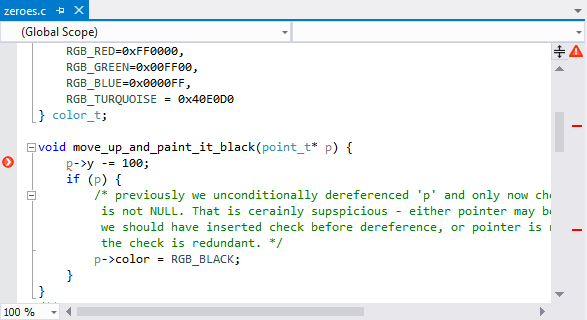
Analyze - Visual Studio ExtensionC/C++ code: With on-the-fly analysis, Klocwork detects issues when you open files and as you type. If you prefer, you can also configure analysis to run whenever you save files. C# code: For pure C# or mixed C/C++ and C# solutions, right-click the solution and select Analyze Solution. Or, right-click a project and select Analyze Selection. A full solution or project analysis detects both C/C++ and C# issues. When Klocwork detects issues in a file, you see issue markers on the left and right margins of the editor. The left markers (chevrons) scroll with the text. When Klocwork detects more than one issue on the same line, the left gutter markers display only the highest-priority issue.
The markers are color-coded by severity:
A few notes about the types of issues the Visual Studio Extension displaysBy default, the Visual Studio Extension identifies and displays desktop, system, and server issues. You can change settings to configure which issues show.
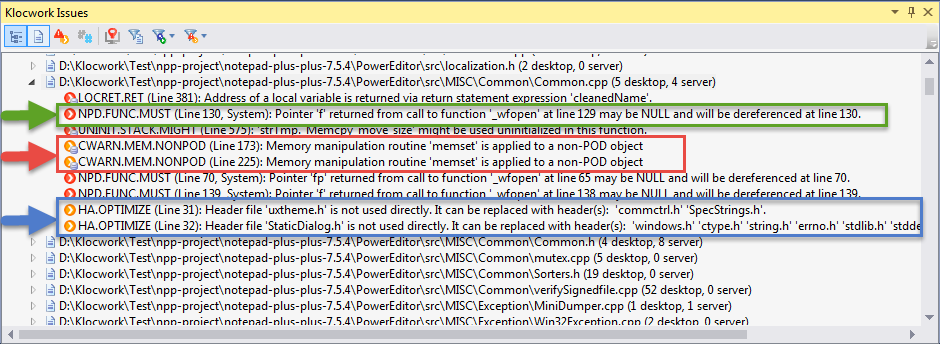
Desktop issuesDesktop issues are issues detected by the Visual Studio Extension. In connected desktop projects, the Visual Studio Extension identifies two types of desktop issues: system issues and local only issues. For example, in the image above:
Show local issues only In the Klocwork Issues window, click the Show local issues only icon Server issuesServer issues are issues that Klocwork has detected in an integration build on the Klocwork Server, but that Klocwork has not detected by using local desktop analysis. This can sometimes occur because of the highly optimized nature of desktop analysis. In the image above, the CWARN.MEM.NONPOD issues highlighted in red are server issues, as indicated by the If you modify the source code to fix a server issue, it won't disappear from the issues list until the next integration build runs. Similarly, if you modify the source code to fix a system issue, it won't be detected by desktop analysis and will become a server issue that won't disappear from the issues list until the next integration build runs. If you're working in standalone desktop mode (that is, not connected mode), all of the issues you see are classed as desktop issues. You will never see any server issues, because you aren't connected to an integration project on the Klocwork Server. Disable loading server issues The Visual Studio Extension displays server issues by default. If you don't want to see server issues in your Klocwork Issues list, do the following:
Analyze - Visual Studio addinC/C++ code: With on-the-fly analysis, Klocwork detects issues when you open files and as you type. If you prefer, you can also configure analysis to run whenever you save files. C# code: For pure C# or mixed C/C++ and C# solutions, right-click the solution and select Analyze Solution. Or, right-click a project and select Analyze Selection. A full solution or project analysis detects both C/C++ and C# issues. When Klocwork detects issues in a file, you see issue markers on the left and right margins of the editor. The left markers (chevrons) scroll with the text. When Klocwork detects more than one issue on the same line, the left gutter markers display only the highest-priority issue.
The markers are color-coded by severity:
Default filtering shows both local and system issues. In connected desktop projects, local issues are those that have been detected by desktop analysis and are likely issues that you've introduced since the last integration build analysis. System issues are issues that have also been detected by an integration build on the Klocwork Server. If you're working in standalone desktop mode (that is, not connected mode), all of the issues you see are classed as local issues. You will never see any system issues, because you aren't connected to an integration project on the Klocwork Server. Review and investigate
Changing an issue's status to show how it should be handledFor a real defect, fix the issue in your code. While working in Visual Studio, the Klocwork plug-ins handle issues as follows:
The exception to this behavior is if you are using the Visual Studio Extension and are fixing a server issue. Server issues remain in the issues list until the next integration build runs. Citing issuesFor your remaining issues, you can set different issue statuses (called citing) that cover several scenarios. Using statuses such as Not a Problem, Ignore, or Defer is a handy way to suppress issues in your results that you don't care about (often in third-party libraries). You can change the status for one issue at a time for selected issues, or for an entire file. You need the Change Issue Status permission to change issue status. For connected projects, status updates are synchronized to the server. Your local project is also updated with changes made by other developers.
If you prefer to simply ignore an issue without specifying a more specific status, right-click the issue and select Ignore Issue. If you want to restore an ignored issue, right-click the issue(s) you want to restore and select Recover Issue. Note: If you have hidden the comment dialog but want to re-enable it, go to Klocwork > Options, click the Appearance tab and select Show change comment dialog.
Showing ignored issuesDefault filtering options hide all issues in statuses other than Analyze and Fix, so once you change an issue's status to something other than Analyze or Fix, you won't see it again. You can adjust your filter settings to show ignored issues:
Discarding issues (CI builds only)If you configure Continuous Integration (CI) builds and open an issue in Visual Studio using the 'open in IDE' button from one of the supported CI plug-ins, this imports the issue into your open project. If you have fixed this issue or simply want to remove it from your issue list, you can right-click the issue and select Discard this issue. Note that this functionality does not apply to issues found from a full analysis; you cannot discard these issues. Submitting a false positive reportFor C/C++ users, false positive reports can be generated to collect information needed to reproduce false positives in specific source files. To submit a false positive report from Visual Studio:
Note: The generated archive contains source code information that may be sensitive. A possible workaround is providing a compilable snippet of source code that reproduces the problem. For assistance, contact Customer Support before submitting the report.
Before you check in
Visual Studio dialogsWithin Visual Studio, you can configure settings for your Klocwork plug-in by using the following dialogs:
Authentication dialog in Visual StudioThe Authentication dialog in Visual Studio allows users to authenticate with the Klocwork Server. When access control has been configured, all users need to authenticate with the Klocwork Server. To access the Authentication dialog, click Login or the status icon in the task bar. The Authentication dialog prompts you to enter your user name and password.
Klocwork then stores a token in the user's home directory, so you need to log in only once. Note that users' passwords are not stored. Once authenticated, you can run any Klocwork tool that points to the same Klocwork Server host and port. To run a Klocwork tool pointing to a different Klocwork Server host and port, you must log in again. Likewise, to run Klocwork as a different user, you must log in again. General Options dialogTo open the General Options dialog in Visual Studio, go to Klocwork > Options. The Options dialog appears with the General tab open by default. Use this dialog to specify the location of the Klocwork Servers and to enable or disable on-the-fly analysis markers and underlining. The Klocwork Server manages integration projects and their associated settings. You can obtain the server location from your Klocwork administrator. The server and port fields must have valid values to run the analysis when it is connected to a Klocwork project. Server specifies the host name of the Klocwork Server. You can enter either an IP address or a host name. The default is localhost. Port specifies the port on which the Klocwork Server listens. The value must be a number between 0 and 65535. The default port is 8080. Enable Use secure connection if a secure connection to the Klocwork Server has been set up. Analysis and Appearance tabsTo configure analysis and appearance settings in Visual Studio, go to Klocwork > Options > Klocwork > General.
Analysis tab
The Analysis tab allows you to enable or disable on-the-fly analysis, as well as limit how often on-the-fly analysis and/or on-demand analysis run. You can configure them both to run one to three threads at a time. Also, you can configure when analysis is run on-the-fly. By default, analysis is run any time you open a file or pause while typing. If you prefer to have it run whenever you save, select On File Save under the On-The-Fly analysis menu. You can also configure if analysis is continued after a file is closed by enabling or disabling the option Continue analysis after the file has closed. Appearance tab
The Appearance tab allows you to enable or disable on-the-fly analysis markers and underlining for detected issues in your editor. You can also configure whether the change comment dialog shows by default and whether or not to show Klocwork engine errors and warnings in the error list. Data tabThe Data tab in Visual Studio allows you to control whether Klocwork data is stored next to the solution, or within a specified central location of your choice. This data includes solution properties, defects, and other meta data used by the Klocwork plug-in. To access the Data tab, go to Klocwork > Options > Klocwork > General and select the Data tab. If you want to store Klocwork data outside of your solution directory, select Store Klocwork data in a specified location. Click Browse and specify the location you would like the data to be stored in. The change takes effect the next time you open the solution. Once you re-open your solution, your existing data is migrated to the new specified location. You can also opt to delete the data instead of migrating it by manually deleting it before making the change to your data location. If you opt to restore storage to the solution directory, the data is migrated when you close the solution. Note: We recommend that you do not move the data from the central directory and allow the Klocwork plug-in to migrate it for you. Manually moving the folder prior to changing it can result in loss of data.
Logging tabYou can configure how verbose you want your log to be by selecting the verbosity level on the logging tab. Click the Verbosity level drop-down and choose from the following options:
Note: Increasing the logging verbosity beyond the default setting may have a negative impact on performance.
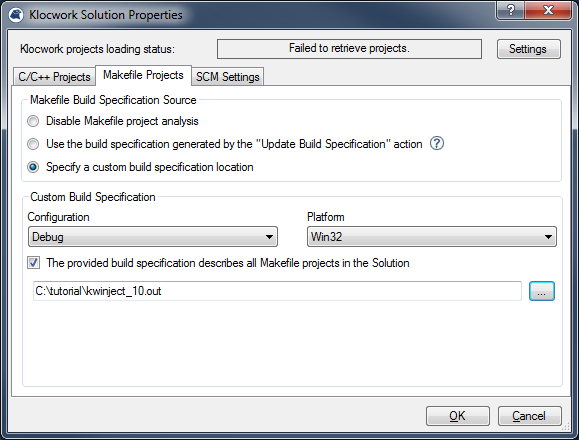
Klocwork Solution Properties dialog in Visual StudioTo open the Klocwork Solution Properties dialog in Visual Studio, right-click a solution and select Klocwork Solution Properties. There are separate tabs for C/C++ and C#, as well as a tab for configuring Source Code Management (SCM) systems. Klocwork projects loading statusThis status bar can display several possible messages, as follows:
C/C++ projects
Makefile projectsYou can use the Update Build Specification action to explicitly generate a build specification for your solution or project. When selected, the Update Build Specification action performs clean and build operations on your project or solution. The build specification is generated on a per-project basis, using the Visual Studio project configuration. To explicitly generate a build specification whenever you right-click your solution, project, folder or file, click Use the build specification generated by the "Update Build Specification" action. Note: This option must be enabled for the Update Build Specification action to appear in the context menu. This is only available for makefile projects.
To use a custom build specification for a project
 C# projects
SCM SettingsThis tab contains a list of SCM's that are supported within Visual Studio. You can configure and test your settings for each SCM manually from this tab if required. |


 to filter the issues list so that it only shows issues that have been found locally on the desktop and not by an integration build on the Klocwork Server.
  icon in the left margin of the issue list.
  and the issue disappears from the list.
 icon and select an ignored status.
 icon .