
Tutorial - Creating a Java KAST checker
Tutorial - Creating a Java KAST checkerThis tutorial describes how to create a custom Java KAST checker. Run kwcreatecheckerFrom the directory in which you want the checker stub files to be created, run kwcreatechecker with the following options: kwcreatechecker --language java --type kast --code KASTJ.MYCHECKER Note: The use of special (and multibyte) characters is not supported with the --code option.
Result A directory is created with the name you specified with --code . This directory contains the checker stub files. In the case of the example above, the directory is named KASTJ.MYCHECKER. The KASTJ.MYCHECKER directory contains:
Create the simplest test caseThe first test case for the checker should be as simple as possible. As the checker is developed more complex cases can be added and tested. Example: Assignment instead of '+=' operator in an expression. It's easy to mistype the '+=' operator in the expression 'a += 5' as an assignment operator: 'a =+ 5' ('=+' instead of '+='). This error still results in valid Java code. Here is a very simple code fragment that will generate a Klocwork issue for this error:
class Testcase {
   public void method() {
      int x = 2;
      int j = x =+5; //Error: assignment instead of +=
   }
}
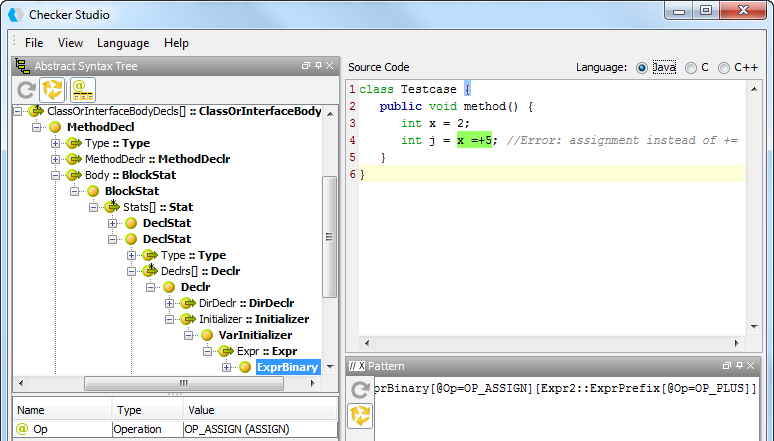
Add this code to the checker's test case file (KASTJ.MYCHECKER/Testcase.java). Use Checker Studio to find KAST nodes of interestNow that you have a simple test case, the next step is to open Checker Studio and paste your code snippet in to view the KAST node names, example code and help information. These will form the building blocks of your KAST expression, which will trace a path to the issue you are identifying with your checker.
Browsing the tutorial test case
Tip: To view context-sensitive help, either select a tree node and press F1 or go to View > Context Help Window. Context-sensitive help displays below the Source Code pane, providing more node information such as supertypes and subtypes where applicable.
Draft the KAST expressionThe entities identified in the last step are: the ExprBinary and ExprPrefix nodes, Expr2 child, and two Op attributes (one should equal OP_ASSIGN, while the other should equal OP_PLUS). Putting this together into the KAST expression gives: //ExprBinary[@Op=OP_ASSIGN]/Expr2::ExprPrefix[@Op=OP_PLUS] This KAST expression will search the AST for prefix plus expression that are left operands of assignments. When the above KAST expression is used, only '+5' will be highlighted. If you want the issue to be reported on the assignment node (instead of the prefix plus expression), you should rewrite this pattern this way: //ExprBinary[@Op=OP_ASSIGN][Expr2::ExprPrefix[@Op=OP_PLUS]] In the second KAST expression, the whole assignment will be highlighted:(x=+5) For more information about KAST expressions, see Java KAST syntax reference. Test the KAST expression
Add more complexity to the test caseThe next step in the KAST checker development process is to add more tests to the test case. Tests to add can be:
For the sample checker in this tutorial, three more false-positive test cases will be added. The checks that will be added are:
These cases should not generate a Klocwork issue report. Change the code in Testcase.java to:
class Testcase {
   public void method() {
      int x = 2; // OK - assignment only
      int j = x =+ 5; // Error: assignment instead of '+='
      int k = x =- 100; // OK - unary '-' instead of unary '+'
      x += 12; // OK - normal '+=' operation, no typo
   }
}
Run the test again using Checker Studio. See Test the KAST expression. The results indicate that no false positives were generated (all the test cases were covered). Add the KAST expression to the checkers.xml fileNow that the checker's KAST expression is complete and tested, it can be added to the checkers.xml file, which was generated at the beginning of this tutorial.
Create help for your checkerChecker documentation can be added by editing the help.xml file. The help file contents are bundled with the checker when you build the checker. When deployed to a server project (and connected desktop), the help contents appear in the online help in Klocwork Static Code Analysis. At minimum, you must provide a description for your checker. Build the checkerNow that the checker's KAST expression is added to the checkers.xml file and help has been created, it's time to build the checker using Ant. At the beginning of this tutorial, kwcreatechecker generated a build.xml file in the checker directory. To build the checker library from the checker directory (KASTJ.MYCHECKER), run: ant install This generates a <CHECKER.CODE>.jar file, in this case, KASTJ.MYCHECKER.jar. What's next?The checker now can be deployed to the Klocwork server, in which case it will be made available to all Klocwork connected desktops when they synchronize with the server. It can also be deployed to individual desktop installations. To learn how, see: |